
Several rookie archers, new and old, it appears to me, rush to make their gear look like that of “excellent bows.” This is particularly true for adolescent archers whose parents are also archers. The difficulty is that such extraneous accouterments may not aid and may even hinder their growth in archery. Every new accessory alters the sensation of their bow and must be tweaked and evaluated. If your pupil is still learning to shoot, they may well not notice that the inclusion of the XYZ Gizmo has made no difference in their archery. And so, by adding heft to an already “extremely heavy” bow, they will impede their movement.
These additions create only little variations in their performance. If they truly want praise and attention for their archery skill, training and honing their technique will pay off about fussing with their gear.
That said, you’re unlikely to make numerous friends if you dismiss every student-desire archer to contribute anything to their arsenal. So, let’s see what you can do.
Becoming Measured
One of the areas where archers require the greatest assistance is with their archer supplies. Even many seasoned archers find the archery marketplace perplexing, particularly for beginners and trainee archers. If you prove useful in assisting with these acquisitions, your judgment on succeeding ones will become increasingly influential. Furthermore, assisting an archer is often one of the greater stuff we do.
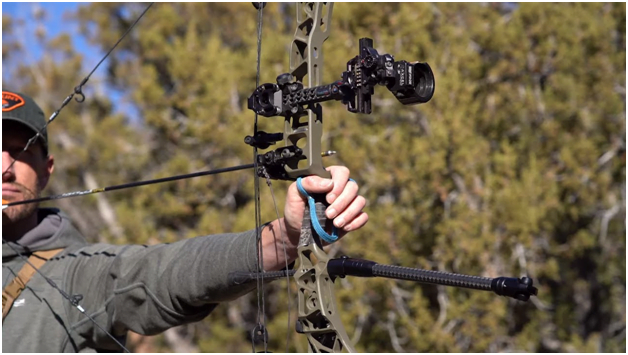
Using Long Rods Short adjusters are legally restricted in length, but long rods are still not; therefore, let’s look at long pole fitting. A simple method for measuring a student for a long pole would be to have them lay their bow at their side, stringed up. Let them hang about as far as it will go, but their arm must remain in the quiver as it does when shooting. Next, calculate the length between the stabilizing boss and the ground. Increase one inch towards this length; this is an excellent starting point for measuring the distance of long rods to use. Throw an extra inch if your shooter still is expanding. If the lengthy rod you want doesn’t come in that size, go on the large side, but not 5-6 feet long since that will be awkward.
In terms of weight, the lighter the rod, the better (stiffer is better, too). A lesser weight out farther has a greater stabilizing influence than a heavier weight closer in. There are currently several reasonably priced fiber-reinforced long rods that are light and quite stiff. If an archer is on a tight budget, he or she can opt for a secondhand rod or a less costly aluminum rod. Aluminum stabilizers were used to shoot some pretty flashy scores. Don’t believe the myth that “carbon is like ham: it makes it all better.”
We suggest that long rod “end weights” start with nothing, perhaps just a plastic cap to cover the threads just one end of the rod. If the rod arrives with end pounds, simply remove them (and place them in a Baggie labeled and date!) and replace them when your shooter feels adventurous or just better.
Installing Side Rods Sidebars and V-bars can exist in a variety of styles. Although “one side only blocks” are available for composite archers, you could also use a standard dual rod block, even if only one rod is usual. The V-bars are available in three different lengths: small, moderate, and big. If your learner is relatively short in stature, the small side rods should be used. I would recommend getting the large side rods if they are pretty tall. If they’re in the middle, tell them to fetch the mediums. When using an adjusted block, the angle that the rod creates with the bow stabilizer handles the rod’s overall length.
To fit these, they must be fitted to the bow, and your archer must shoot some practice shots to get used to the different feel. Following the “broken-in” phase, you should ask people how the arrow feels. If they don’t notice, have students shoot several arrows blind bale, instructing them to pay close attention to how solid the bow feels at the maximum draw and which way the arrow tends to move after the shot is loose.
The total weight is shifted from the back to the front by angling the sidebar or bars downward. The most effective technique to move weight forward would be to add weight to the tip of a long rod.
To determine how the bow is poised, suspend it from a loop or looped of cord that allows it to hang freely. You’ll eventually develop an “eye” for how a well-balanced bow hangs. The bow must hang perfectly straight from behind the bow; if it doesn’t, the weighing of the side rod needs to be changed.
Testing, Testing, and More Testing
We have repeatedly advocated that anytime anything fresh is added to a bow (or the attachments are jacked up, and the new bow is installed), the new outfit is checked against by the old. Records on the layout of the “old rig” must be taken and measurements of how it functions. The “new rig” must then be established, modified, tweaked, and evaluated in the same manner. This is how real competitive archers practice.
Conclusion
Don’t pound this strategy like a borrowed donkey. In this case, a little goes a big way. Your initial objective should be to establish that “this is how things get done.” You’re not attempting to prove that this is the right gear set up in the world with your archer. Jake Kaminski, a U.S. archer, has established a YouTube account and has created some instructive videos wherein he takes through putting up new apparatus and testing it. He is a skilled archer who has figured out the ideal way to complete those jobs for him. You’ll also see how much equipment he buys and tries to find small improvements in his performance. The level of work is incredible. Do not try to imitate this because your students are still not ready. Keep elite archer practices for elite archers only.


